AI bots and automated crawlers are a fast-growing share of the traffic that hits your websites and APIs. Some of them you want: the ones that bring subscribers, partners, and discovery. Others you do not: impersonators and scrapers that take without asking. The hard part has always been telling the two apart. AWS WAF helps by attaching labels to bot traffic, and your Web ACL rules act on those labels to allow, block, or rate-limit a request before it reaches your origin.
AWS Agent Registry, a capability of Amazon Bedrock AgentCore, gives you a new signal to work with for agents, bots, and AI-enabled tools. A bot can register using WebBotAuth (WBA) and prove, cryptographically, that it is affiliated with a domain its operator owns, establishing organizational ownership. When that bot signs a request, AWS WAF Bot Control checks the signature and labels the request with the outcome: web_bot_auth:verified when it validates, or invalid, expired, or unknown_bot when it does not. Bot Control also adds a label that identifies the bot by name, and for Amazon Bedrock AgentCore Browser tools, a vendor label that groups an operator’s bots together. The web_bot_auth:verified outcome tells you the request is authentic. The other outcomes tell you it is not. The name, and the vendor where present, tell you who owns it. You write rules that combine the two, for example allowing a bot only when its signature is verified, and its name is the one you trust.
This post shows how to use the WebBotAuth support in AWS WAF Bot Control to control bot access by signature and registered identity. It is written for content providers who already use AWS WAF. You must be familiar with AWS WAF Web ACLs, rules, and labels.
Overview of the solution
A bot operator registers their bot with AWS Agent Registry under a domain they control, proving ownership through a standard DNS challenge. AWS WAF reads the registered WebBotAuth (WBA) bots from AWS Agent Registry, so the operator never signs up with AWS WAF directly. From then on, when the bot’s traffic reaches your application, AWS WAF checks each signed request against the key the bot registered with and adds a web_bot_auth:verified label when it matches.
Your Web ACL rules act on two kinds of labels: the web_bot_auth outcome tells you whether the signature checked out, and the name label (plus a vendor label for AgentCore Browser tools) tells you who the bot is.
Figure 1 shows the flow from bot registration to your rule acting on the traffic.
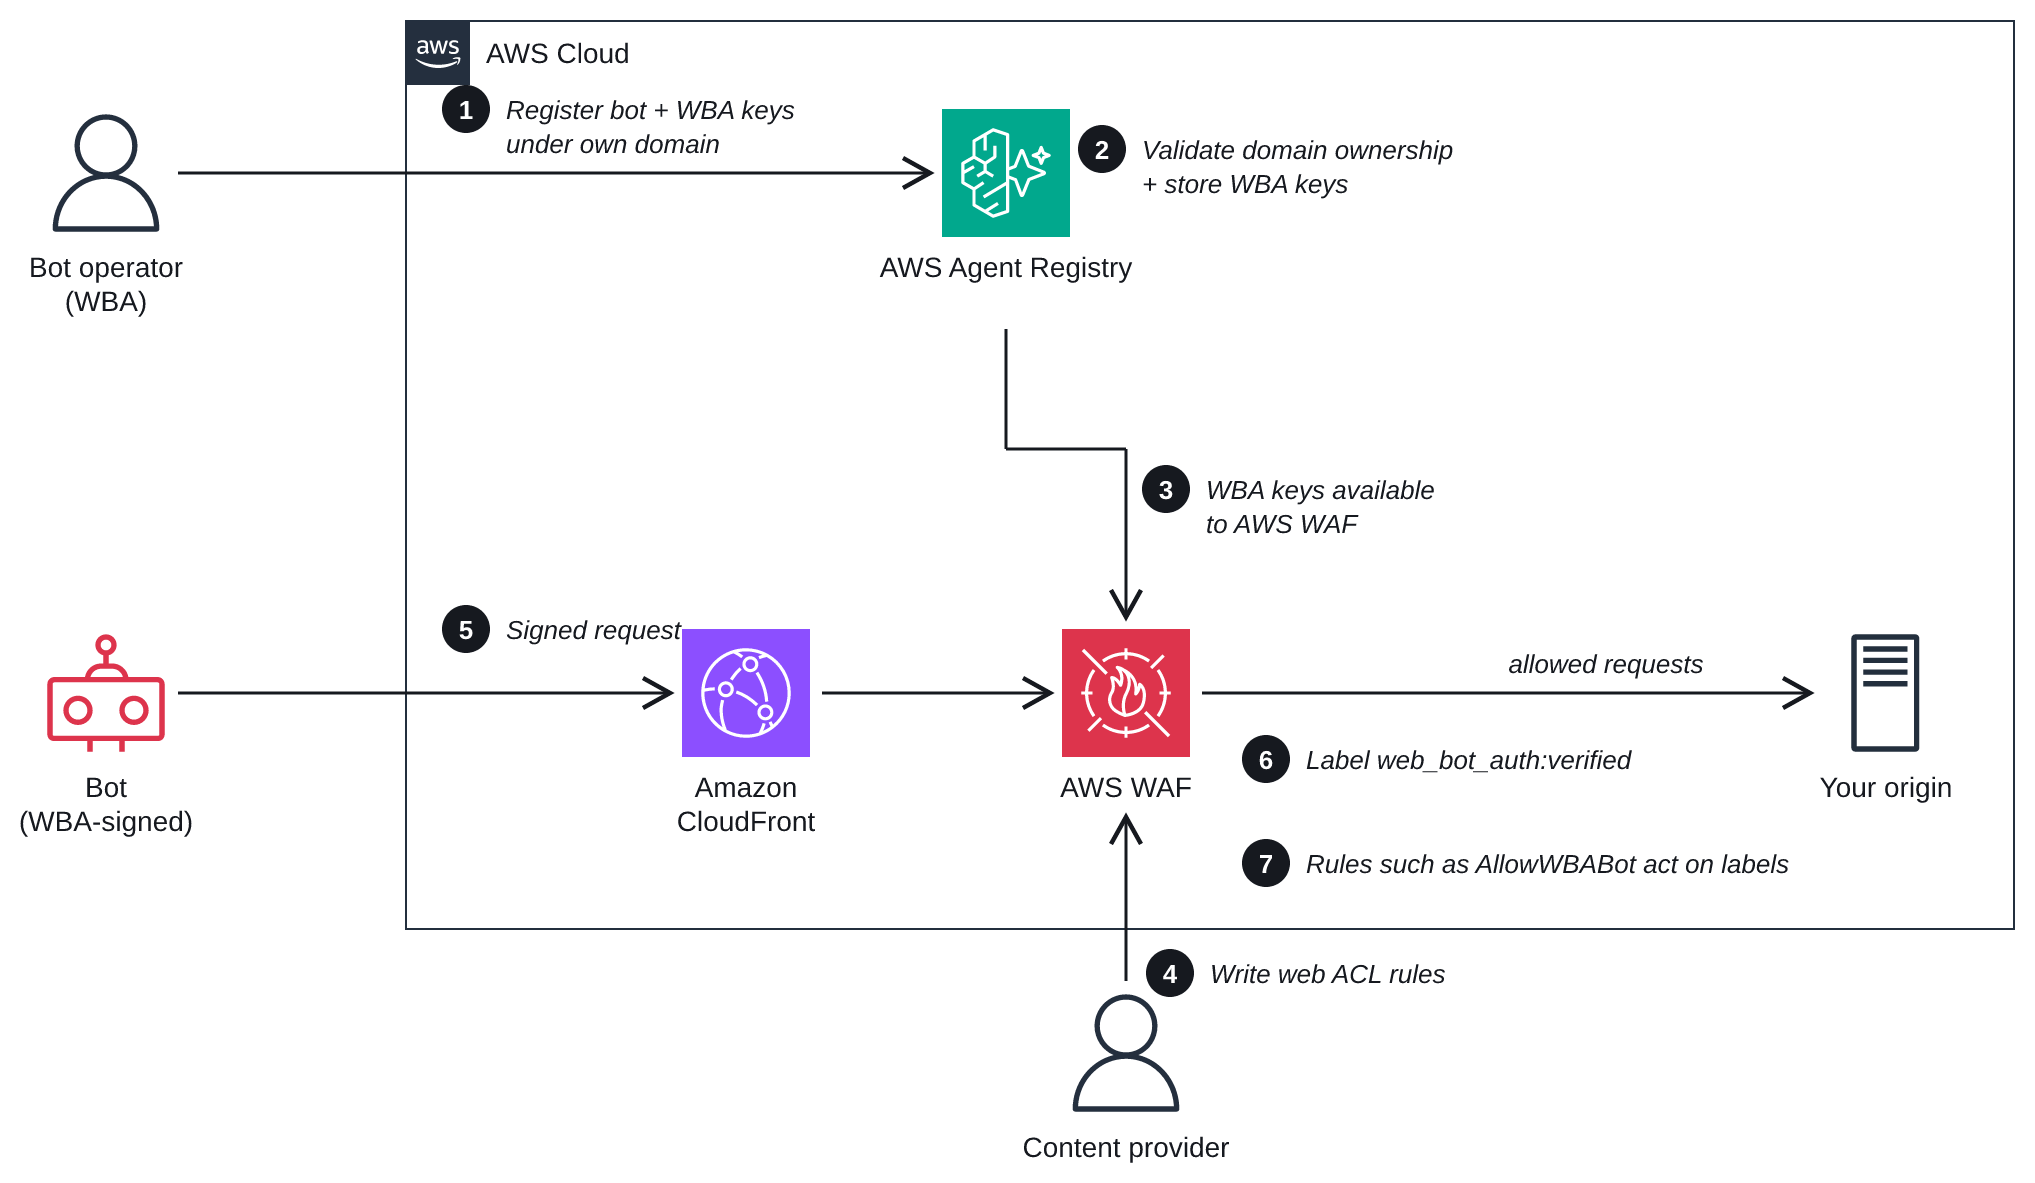
Figure 1: Data flow from a bot registering with AWS Agent Registry to your Web ACL rules acting on the labeled traffic
- A bot operator registers their bot with AWS Agent Registry, proving ownership through a standard DNS challenge. The following sections cover this flow in detail.
- AWS Agent Registry validates domain ownership and the submitted signing keys.
- The registered keys become available to AWS WAF.
- The bot sends a signed request to your application, which runs behind Amazon CloudFront and AWS WAF.
- AWS WAF Bot Control labels the request with the WebBotAuth outcome (
verified,invalid,expired, orunknown_bot) and the bot’s name label, plus a vendor label for Amazon Bedrock AgentCore Browser tools. - Your Web ACL rules match on those labels and decide how to handle the request before it reaches your origin.
Why does the identity matter on top of the signature? Because a valid signature and a trustworthy operator are two different things. Proving control of a domain is a strong, verifiable signal, the same one that underpins TLS certificates, and AWS Agent Registry makes it easy for a bot to establish it. But a valid signature alone does not tell a content provider that the bot named acme-crawler belongs to ACME Corp. Someone could register a bot under a domain they legitimately own, give it a well-known name, and sign validly. That is not a gap in the Registry. It is simply the difference between “this request is authentic” and “this is the operator I think it is.” The web_bot_auth outcome answers the first. The name label, and the vendor label for AgentCore Browser tools, answer the second. Matching on both is what lets you recognize an authentic WBA bot and still decide for yourself which operators you trust.
For AgentCore Browser tools, the vendor label makes rules manageable at scale. A single operator may run many bots under many names, but they share one vendor, so one rule against the vendor label can allow or restrict all of that operator’s bots at once. The vendor label is currently available for Amazon Bedrock AgentCore Browser tools only. For other WebBotAuth bots, match on the bot name.
How a WebBotAuth bot is registered
- Create or select a registry. Go to AWS Agent Registry and choose Create registry, or select an existing registry if the one you want to register your bot in already exists.
- Register and verify the domain. The operator adds the domain they want the bot published under and that they own, for example
acme.com, as a publisher and completes DNS validation. The bot’s verified identity comes from this domain, so a bot meant to appear asacme.commust be registered under theacme.compublisher. The publisher must reach ACTIVE before a bot can be published under it.
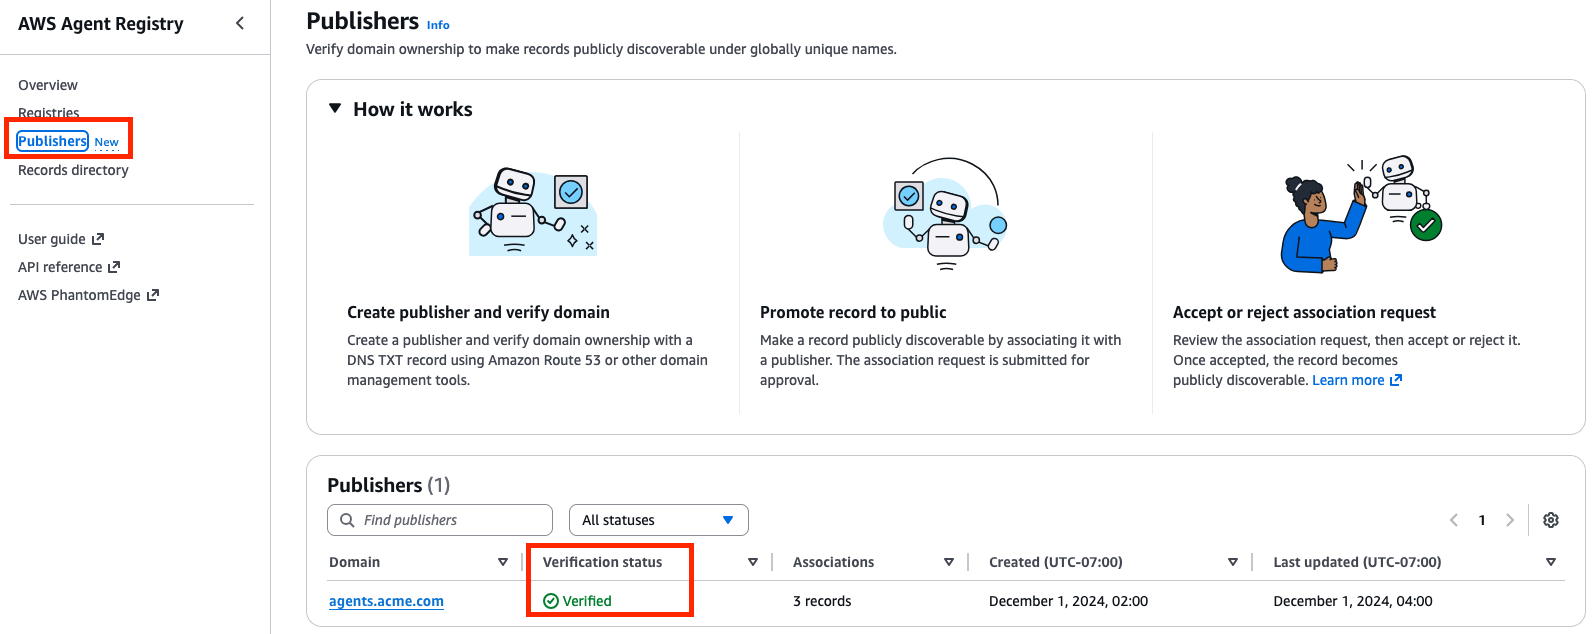
Figure 2: Registering a publisher domain and completing DNS validation
- Create the Web_Bot record. On the Create record page, the operator sets Record source to define manually. The operator creates a record of type
WEB_BOT.
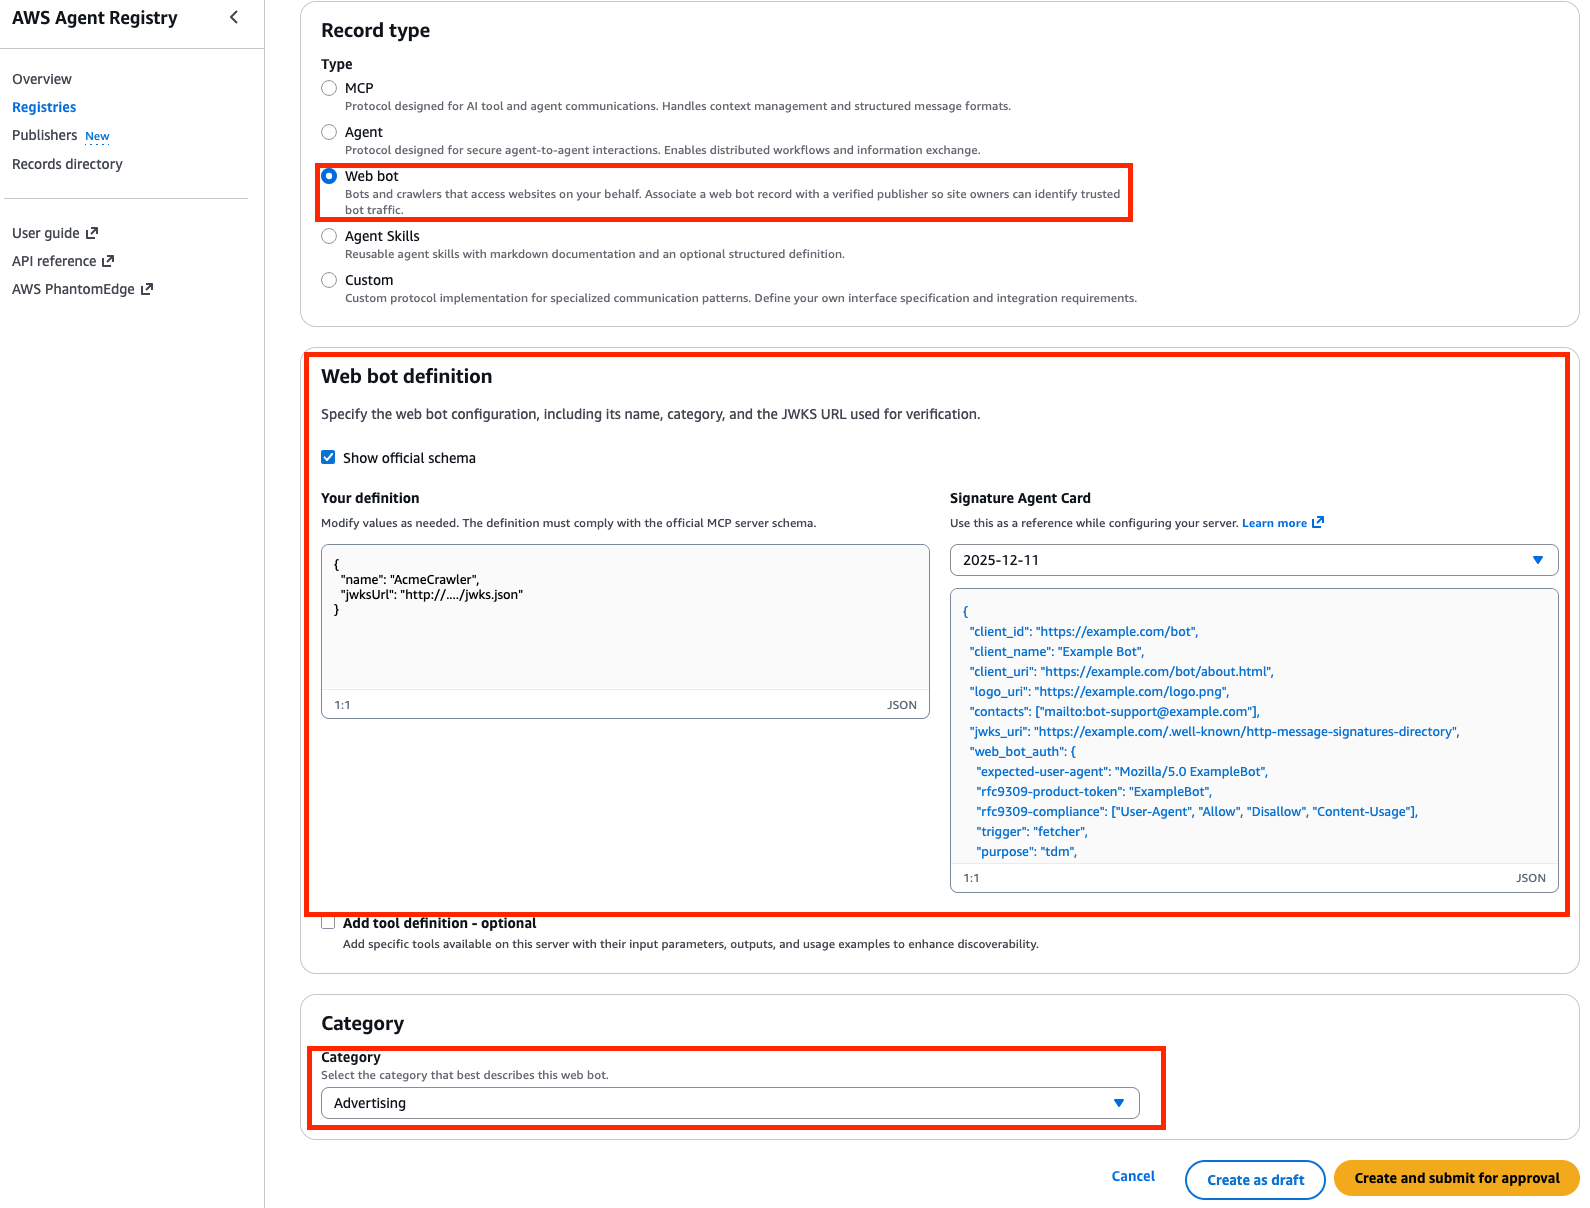
Figure 3: Creating a WEB_BOT record with the record source defined manually
- Associate the record with the verified publisher. In the Registry records list, select the approved Web bot record (its status must be Approved). Choose Manage, then Associate with publisher. AWS Agent Registry then fetches and validates the bot’s signing keys, and the association awaits review.
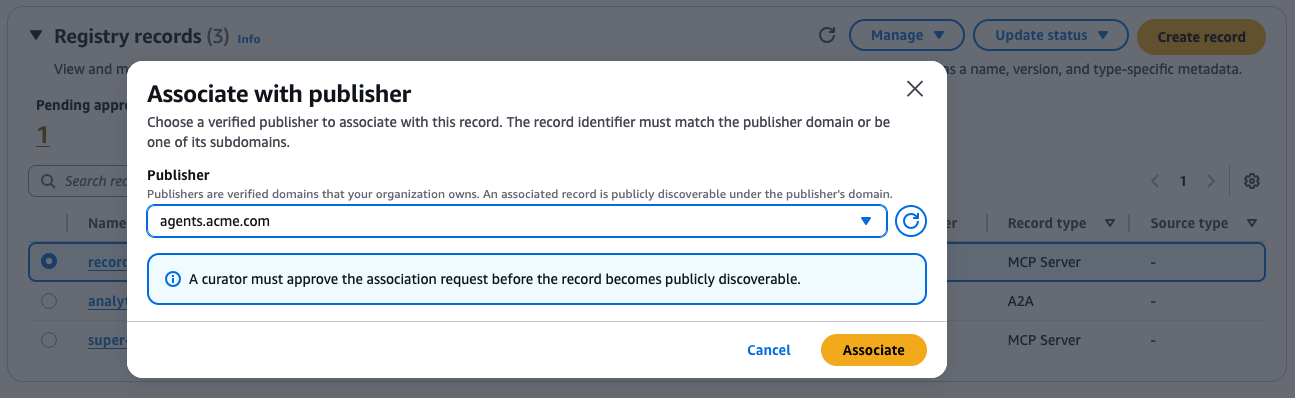
Figure 4: Associating an approved Web bot record with its verified publisher
- Review approves the association. The bot’s keys and attributes become available to AWS WAF, which can now verify the bot’s signed requests.
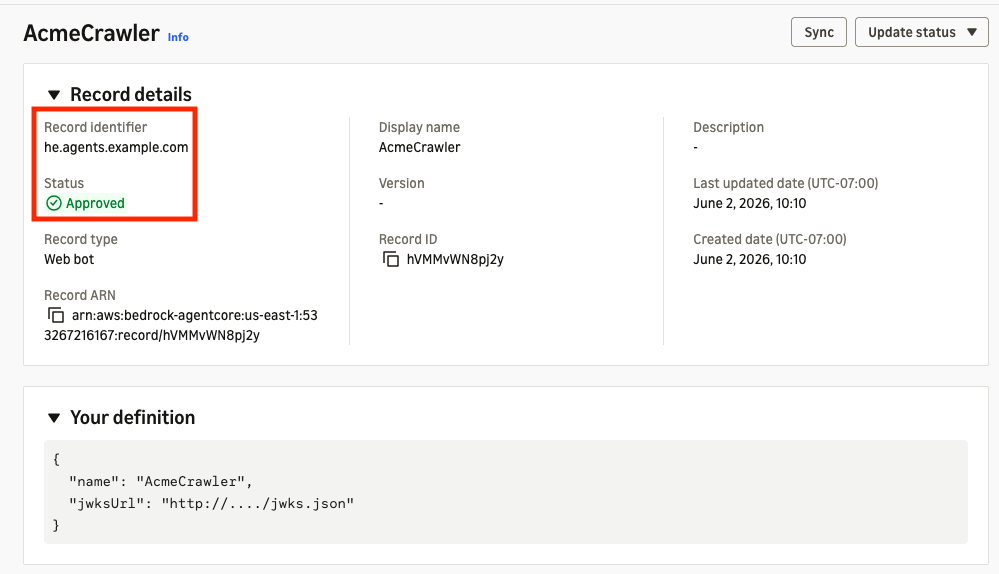
Figure 5: The approved association, with the bot’s keys and attributes available to AWS WAF
The fields the operator sets at registration are the labels you match on:
| Set at registration | Becomes the label |
name | bot:name |
category, for example AI_ASSISTANT | bot:category, normalized to lowercase, for example ai_assistant |
| verified publisher domain | bot:organization |
The signature outcome (web_bot_auth:verified, invalid, expired, unknown_bot) is not set at registration. AWS WAF computes it per request against the registered keys.
The WebBotAuth labels
AWS WAF Bot Control attaches labels to bot traffic, and your rules act on them. For a WebBotAuth bot, the labels fall into two groups:
- The signature outcome.
web_bot_auth:verifiedmeans the signature validated against the key the bot registered.invalid,expired, andunknown_botare the ways it can fail. This tells you whether the request is cryptographically authentic. - The bot’s identity. The
namelabel identifies the bot and is what you match on to allow or restrict a specific bot. For Amazon Bedrock AgentCore Browser tools, a vendor label also groups an operator’s bots together, so you can write one rule for all of them.
The full labels and the action each one suggests follow.
| Label | Meaning | Suggested action |
awswaf:managed:aws:bot-control:bot:web_bot_auth:verified | Successful cryptographic verification | Allow |
awswaf:managed:aws:bot-control:bot:web_bot_auth:invalid | Failed verification attempt | Block or rate-limit |
awswaf:managed:aws:bot-control:bot:web_bot_auth:expired | Expired key used | Block and alert |
awswaf:managed:aws:bot-control:bot:web_bot_auth:unknown_bot | Unrecognized key | Monitor or block |
awswaf:managed:aws:bot-control:bot:vendor:<vendor_name> | Bot vendor or operator, currently available for Amazon Bedrock AgentCore Browser tools only | Vendor-specific rules |
awswaf:managed:aws:bot-control:bot:name:<rfc_name> | Bot name (RFC token from WBA) | Bot-specific rules |
Writing rules for a WebBotAuth bot
You have two ways to act on these labels: let the AWS Managed Rules Bot Control rule group apply its defaults, or write a custom rule that matches the labels yourself. Nothing here is new to how AWS WAF rules work. The bot carries labels, and you write rules against labels the same way you do for any other labeled traffic.
Option 1: Turn on Bot Control and write rules on its labels
The AWS Managed Rules Bot Control rule group inspects traffic and adds the WebBotAuth labels to each request. Turning it on is what produces these labels. You then decide what happens to each by adding label-match rules, as shown in Option 2. The “Suggested action” column in the preceding table is a recommendation, not an action Bot Control takes on its own. Start in count mode to see which labels your traffic carries before you attach any actions.
Option 2: Write a custom rule that matches the labels
When you want to say exactly how a specific WBA bot is handled, write a custom label-match rule. Match the web_bot_auth:verified outcome together with the name of the bot you trust, or the vendor for AgentCore Browser tools. Never match on the name alone. A rule that allows on a name by itself would also match a request that signed validly under an operator you did not mean. Combining the verified outcome with the name or vendor closes that gap.
Prerequisites
- An AWS account with permissions to manage AWS WAF.
- An application fronted by Amazon CloudFront, Elastic Load Balancing with Application Load Balancer, or Amazon API Gateway, with an AWS WAF Web ACL attached.
- AWS Managed Rules Bot Control turned on for the Web ACL, so that bot traffic is labeled.
To allow a specific WebBotAuth bot
- Open the AWS WAF console.
- In the navigation pane, choose Protection packs (Web ACLs), then choose the Web ACL attached to your application.
- Choose the Rules tab, then choose Add rules, and choose Add rule.
- For Rule type, choose Rule builder, and enter a name such as
AllowWBABot. - For Statement, choose Match type of Has a label.
- For the first label match, enter the verified-outcome label,
awswaf:managed:aws:bot-control:bot:web_bot_auth:verified. - Choose And to add a second statement, and enter the name label for the bot you trust, for example
awswaf:managed:aws:bot-control:bot:name:acme-crawler. - For Action, choose Allow.
- Choose Add rule, then set the rule Priority so it runs before any broad block rule.
- Choose Save.
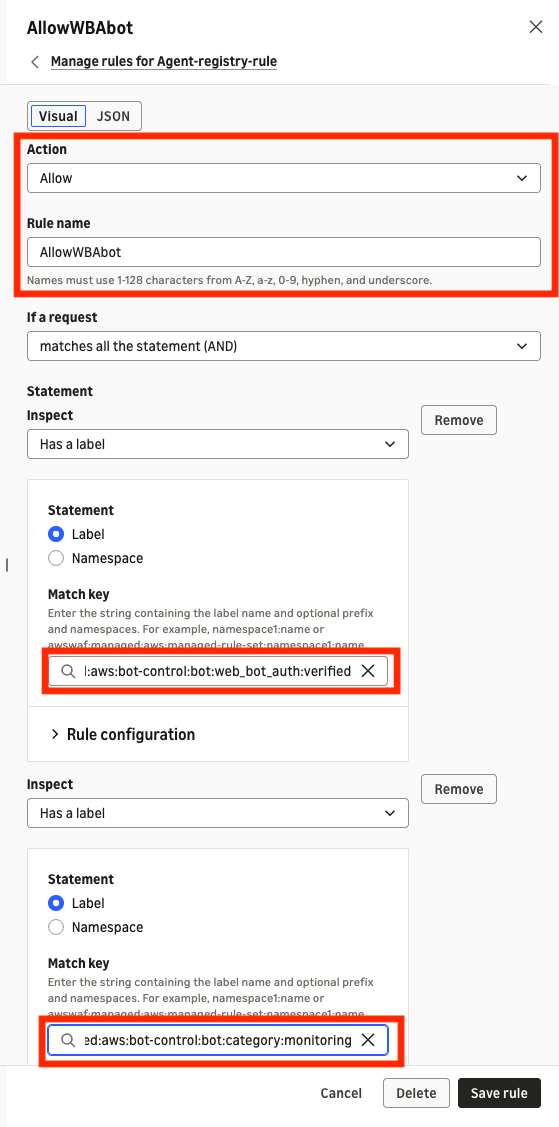
Figure 6: A custom rule that allows a bot only when the verified outcome and the trusted bot name both match
To block or rate-limit WebBotAuth bots that fail verification
- In the same Web ACL, choose Add rules, then Add my own rules and rule groups, then Rule builder.
- Enter a name such as
BlockFailedWba. - For Statement, choose Match type of Has a label, and enter one of the failure labels, for example
awswaf:managed:aws:bot-control:bot:web_bot_auth:invalid. Addexpiredandunknown_botas separate statements combined with Or if you want to cover all three. - For Action, choose Block. For
unknown_bot, you may prefer Count first to monitor before blocking. - Set this rule’s Priority lower than the allow rule from the preceding procedure, so trusted bots are allowed first.
- Choose Save.
Test before you enforce
Set a new rule to Count before you set it to Block or Allow. Count mode records what the rule would do without changing live traffic. Review the counts in Amazon CloudWatch metrics and the sampled requests in the Bot Control dashboard, confirm the rule matches the bots you expect, then switch it to its final action.
Further considerations
- Match the outcome and the identity together.
web_bot_auth:verifiedmeans the signature checked out, not that the operator is one you trust. Match it together with the name (or the vendor for AgentCore Browser tools) so an allow applies only to the bot you intend. - Handle the failure cases deliberately.
invalid,expired, andunknown_boteach mean something different. An expired key is worth an alert. An unknown key is worth monitoring before you block. Treat them separately rather than lumping all non-verified traffic together. - Write at the vendor level for AgentCore Browser tools. An AgentCore operator may run many bots under many names but share one vendor. Matching the vendor label lets you set rules for all of them at once. For other WebBotAuth bots, match on the bot name.
Conclusion
Bot traffic to your content is only going to grow, and an authentic signature is not the same as a trusted operator. In this post, you saw how AWS WAF Bot Control labels WebBotAuth bots registered with AWS Agent Registry, and how to write rules that match the verified outcome together with the bot’s name or vendor, tested first in count mode.
From here, review the AWS WAF documentation on labels and rules, turn on Bot Control for a test Web ACL, and write your first rule for the WebBotAuth bots that matter most to your content.
Further reading
- The AWS WAF Developer Guide explains Web ACLs, rules, and labels in depth.
- The Amazon CloudFront Developer Guide covers associating an AWS WAF Web ACL with a distribution.
- The AWS Agent Registry page covers how builders register and verify agents.


