PDF files are commonly used to share presentations, scripts, reports, lesson materials, comic pages, and other visual documents. But reviewing a long PDF page by page can take time, especially when someone needs to understand the overall sequence of scenes, slides, or visual content.
A storyboard provides a more organized way to review this information. Instead of opening every page individually, users can arrange selected PDF pages into a single sheet containing multiple panels. Each panel can include a page number, a caption, and a visual preview of the original page.
In this tutorial, we'll explore how to build a browser-based PDF Storyboard Generator using JavaScript, PDF.js, and PDF-lib.
The application takes pages from an existing PDF and arranges them into printable storyboard sheets. Users can choose different layouts, select the pages they want to include, add captions, customize the appearance, preview the result, and download the finished storyboard.
The application runs directly in the browser. The uploaded PDF is processed locally rather than uploaded to the website's server.
We'll examine the implementation step by step, including PDF rendering, page selection, caption handling, layout calculations, preview generation, and file export.
What We'll Cover:
- What Is a PDF Storyboard Generator?
- Main Features of the Application
- Understanding the Browser-Based Workflow
- Project Setup
- Libraries Used
- Preparing the HTML Workspace
- Selecting the Main DOM Elements
- Defining Important Configuration Values
- Understanding the Application State
- Uploading a PDF
- Loading the PDF with PDF.js
- Measuring PDF Pages
- Rendering PDF Pages on Canvas
- Reusing Rendered Page Previews
- Reading Text from PDF Pages
- Filling Empty Captions Automatically
- Updating the Preview
- Choosing the Storyboard Layout
- Controlling Rows, Columns, and Paper Size
- Selecting PDF Pages and Their Order
- Adding Panel Labels
- Drawing the Storyboard Sheet
- Updating the Live Preview
- Adjusting Caption Appearance
- Navigating Between Storyboard Sheets
- Reading Scanned Pages with OCR
- Generating the Final Storyboard PDF
- Downloading PNG Storyboard Sheets
- Downloading Individual Page Pictures
- Performance and Important Considerations
- Demo: PDF Storyboard Generator
- Conclusion
What Is a PDF Storyboard Generator?
A PDF Storyboard Generator converts selected pages from an existing PDF into a structured visual sheet.
For example, imagine that you have a PDF containing 20 presentation slides. Instead of sharing all 20 slides separately, you can arrange them into a storyboard containing three columns and two rows per sheet.
Each panel displays a scaled version of its original PDF page. You can also add a number or label and write a short description underneath.
The same approach can be useful for:
- Reviewing presentation slides.
- Organizing comic pages.
- Planning video scenes.
- Preparing visual scripts.
- Reviewing scanned documents.
- Creating printable teaching materials.
- Organizing page sequences for creative projects.
The application doesn't create new scenes or draw illustrations. It arranges existing PDF pages into a storyboard layout.
Main Features of the Application
Before writing the code, let's understand the features we're going to implement.
1. PDF Upload
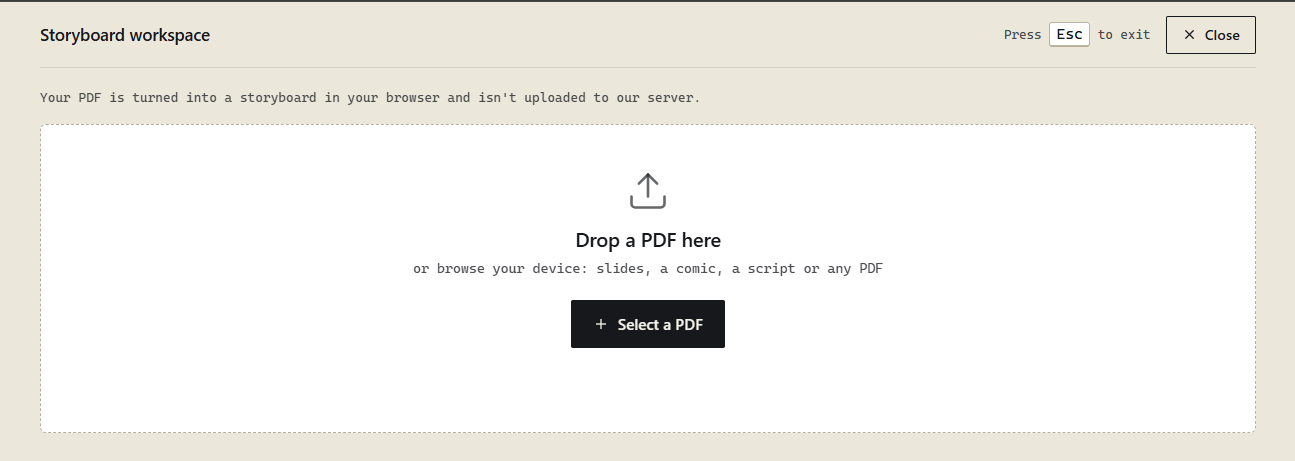
Users can select a PDF from their device or drag and drop it into the upload area.
2. Multiple Storyboard Layouts
The application supports three layouts:
- Grid: Arranges pages in rows and columns.
- Panels with notes: Provides space for written notes alongside the page panels.
- Film strip: Arranges pages in a film-strip style.
3. Page Selection and Ordering
Users can choose which PDF pages should appear in the storyboard. They can also specify a custom order rather than following the original PDF sequence.
4. Captions
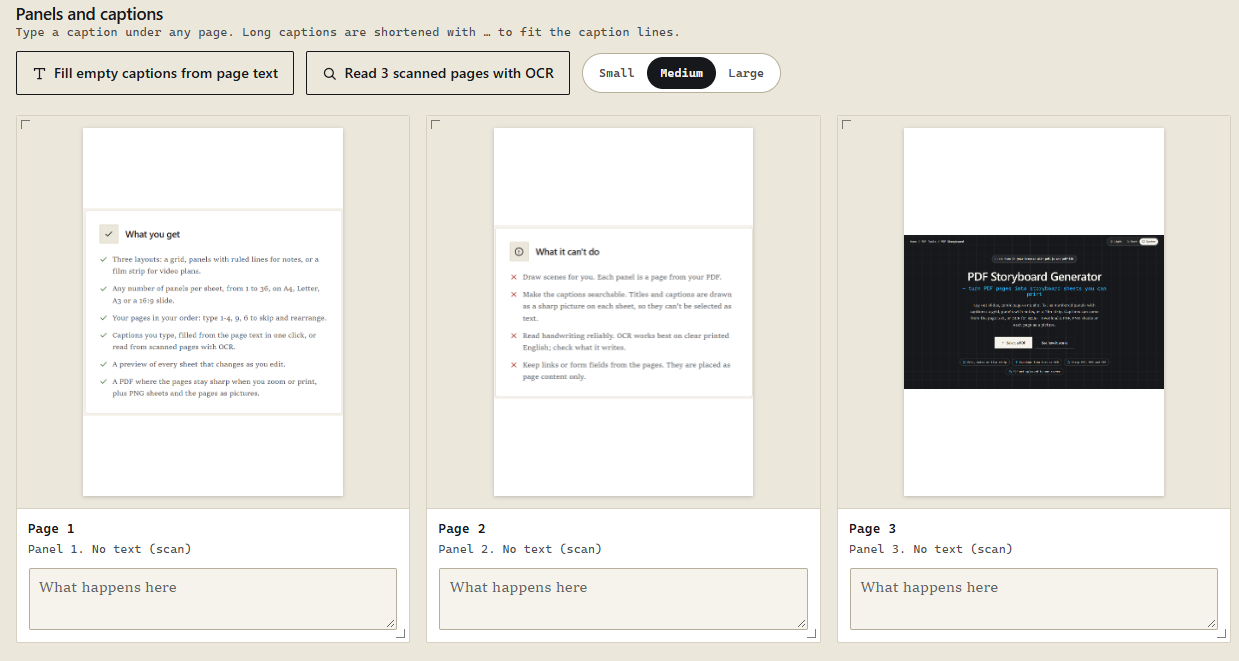
Users can type captions manually, fill empty captions using extracted PDF page text, or use OCR to read text from scanned pages.
5. Customization
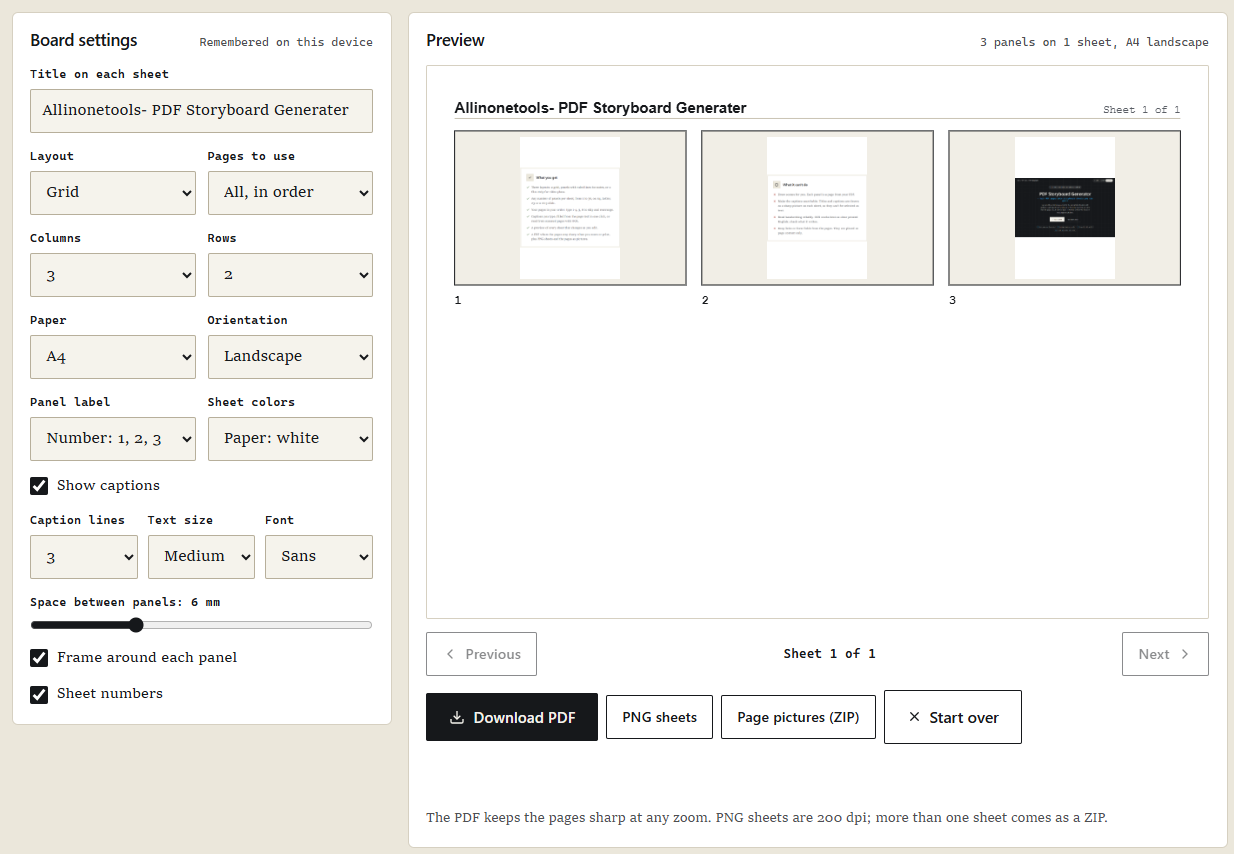
Users can customize the paper size, orientation, number of columns and rows, panel labels, sheet colors, caption font, text size, spacing, and panel frames.
6. Live Preview
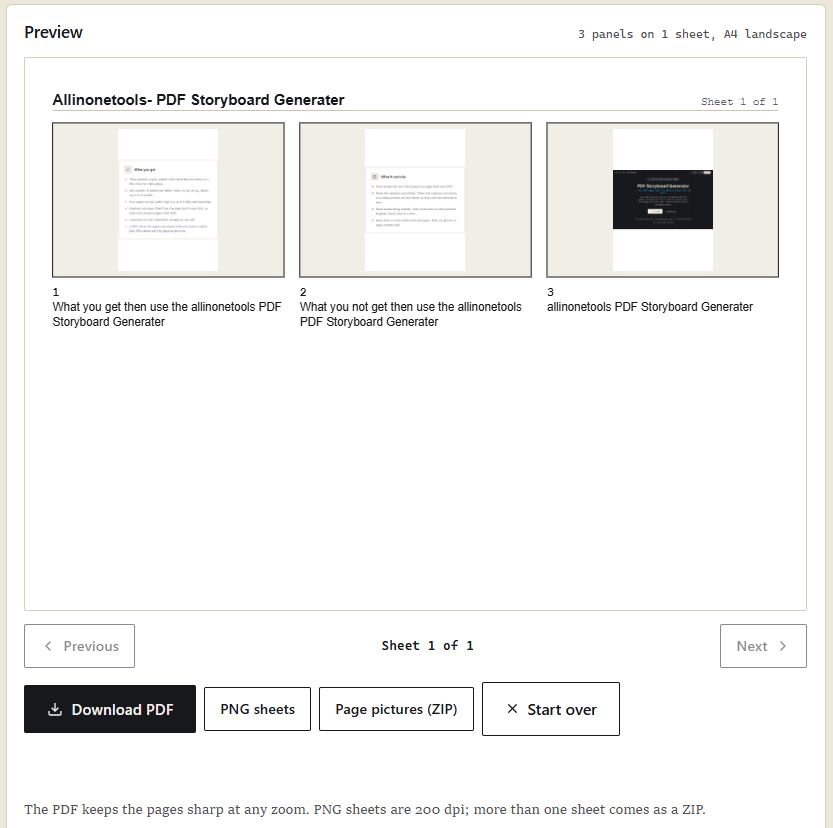
The application generates a preview of the storyboard sheets. Users can review the arrangement before downloading the final output.
7. Multiple Export Formats
Users can export their work as:
- A PDF storyboard.
- PNG storyboard sheets.
- A ZIP file containing individual page pictures.
The PDF export preserves original page content as vectors when possible, helping maintain sharp text and graphics.
Understanding the Browser-Based Workflow
The application follows a straightforward process.
- The user selects or drops a PDF file into the upload area.
- PDF.js loads the document and renders its pages.
- The application displays page previews and caption fields.
- The user selects pages, changes their order, and enters captions.
- The user configures the storyboard layout and appearance.
- JavaScript calculates the position and dimensions of every panel.
- The preview is updated to reflect the selected settings.
- PDF-lib and browser canvas functionality are used to generate the requested output.
- The browser downloads the finished file.
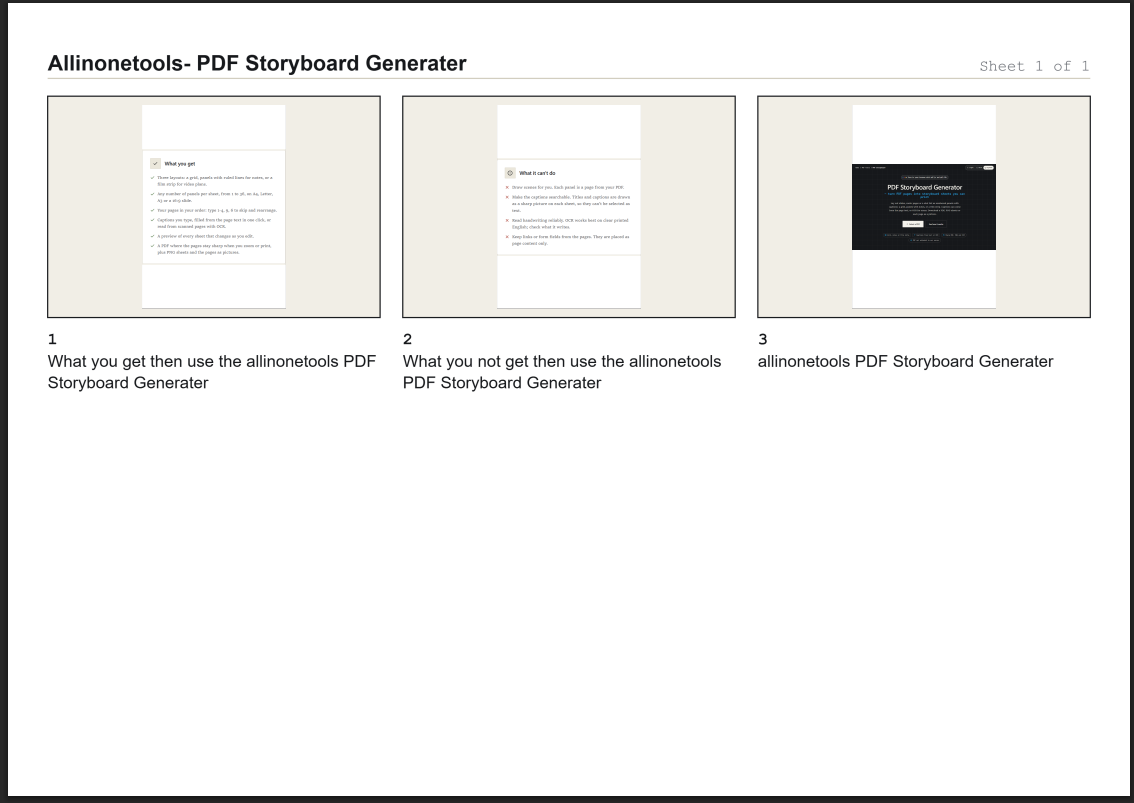
PDF Upload Workspace
Panels and Captions
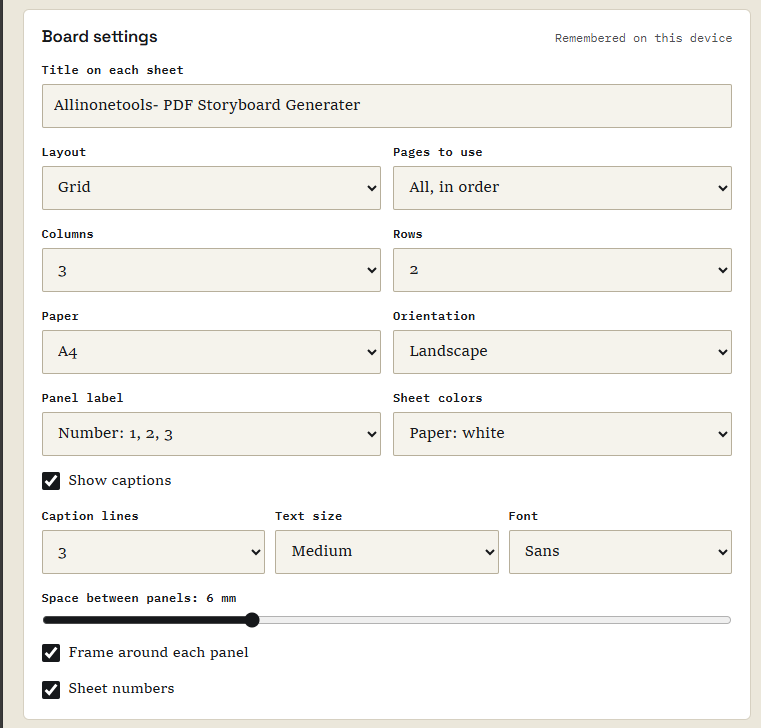
Board Settings and Preview
Final Storyboard Preview
Downloaded PDF
Project Setup
Before writing the JavaScript functionality, we need to understand how the application is organized.
The PDF Storyboard Generator combines HTML, CSS, and JavaScript. HTML provides the interface, CSS controls the appearance of the workspace and storyboard sheets, and JavaScript handles PDF processing, page previews, captions, layout calculations, and downloads.
For a standalone development project, we can organize the files like this:
pdf-storyboard-generator/ ├── index.html ├── style.css ├── script.js └── assets/ The index.html file contains the application structure, including the upload area, page panels, caption fields, board settings, and preview.
The style.css file controls the appearance of the application. It defines the workspace, panel grid, form controls, buttons, preview area, and responsive layout.
The script.js file contains the main application logic. It loads PDF documents, renders their pages, manages captions, processes OCR requests, calculates storyboard layouts, and generates downloadable files.
The assets directory can hold any additional local resources required by the project.
In the existing AllInOneTools implementation, these components are integrated into the website's tool page rather than being deployed as four separate files. The same separation of responsibilities still applies.
Libraries Used
The application uses three main JavaScript libraries or browser technologies for its PDF and image-processing workflow.
1. PDF.js
We'll use PDF.js to open PDF documents and render their pages inside the browser.
It allows JavaScript to access individual pages, retrieve their dimensions, create viewports, and draw page content onto an HTML canvas.
For this project, PDF.js is responsible for the original PDF page previews.
The application uses the PDF.js document API to retrieve pages and render them at the required dimensions. This is important because the storyboard must display a visual representation of each selected page before the user downloads the finished sheet.
2. PDF-lib
We'll use PDF-lib used when generating the final PDF document.
PDF.js and PDF-lib have different responsibilities. PDF.js reads and renders the source document, while PDF-lib creates the new storyboard PDF.
The application uses PDF-lib to create output pages, embed the original PDF pages when possible, and place the finished storyboard elements onto those pages.
Keeping the original PDF pages as vector content helps preserve text and line quality when users zoom in or print the exported document. The implementation also uses a raster-based fallback for password-protected PDFs that can't be loaded through the regular PDF embedding path.
3. Tesseract.js
This library provides optional Optical Character Recognition (OCR).
Not every PDF contains selectable text. A scanned document, for example, may contain photographs of printed pages instead of actual text data.
When the user selects the OCR option, the application loads Tesseract.js and its English language data. It then processes eligible scanned pages and attempts to extract their text for captions.
OCR is optional, so users don't need to load the OCR engine when they only want to arrange PDF pages and write captions manually.
The following example illustrates how a standalone project could include the libraries through CDN scripts:
<script src="https://cdnjs.cloudflare.com/ajax/libs/pdf.js/4.4.168/pdf.min.js"></script> <script src="https://unpkg.com/pdf-lib/dist/pdf-lib.min.js"></script> <script src="script.js"></script> For a production application, use library versions that you've tested and configure the matching PDF.js worker file as required by your chosen PDF.js build.
Why These Libraries Work Together
Each library has a separate responsibility.
PDF.js reads the source PDF and renders its pages. Tesseract.js optionally extracts text from scanned pages. PDF-lib creates the final storyboard PDF.
JavaScript connects these operations and manages the user interface.
This separation makes the application easier to understand and maintain. It also avoids using one library for tasks that are better handled by another.
Preparing the HTML Workspace
The interface needs several areas to support the complete storyboard workflow.
The upload area accepts the source PDF. The panel area displays rendered pages and caption fields. The board settings area contains layout and appearance controls. Finally, the preview area displays the generated storyboard sheets.
A simplified HTML structure looks like this:
<section id="aiot-sb"> <div id="aiot-sb-drop"> <input type="file" id="aiot-sb-file-input" accept="application/pdf,.pdf" > <button type="button" data-act="browse"> Select a PDF </button> </div> <div id="aiot-sb-grid"></div> <div id="aiot-sb-settings"></div> <div id="aiot-sb-preview"></div> </section> This is an illustrative structure showing the main interface areas. The actual application contains additional controls, accessibility attributes, and elements for its different operations.
The aiot-sb container provides a common root for the application. JavaScript can use this root to find the relevant interface elements without searching the entire website.
Selecting the Main DOM Elements
JavaScript needs references to the interface elements before it can respond to user actions.
The application starts by finding its root container and checking whether initialization has already taken place:
var root = document.getElementById("aiot-sb"); if (!root || root.getAttribute("data-aiot-sb-ready")) { return; } root.setAttribute("data-aiot-sb-ready", "1"); This prevents the application from initializing again if the script is executed more than once.
The implementation uses a small helper to find elements inside the application:
function q(selector) { return root.querySelector(selector); } For example, q('[data-act="browse"]') finds the button used to open the PDF file picker.
Using a root-specific helper also helps keep the application code organized when the website contains other tools or interface components.
Defining Important Configuration Values
The application needs a few shared configuration values for its layouts and output settings.
For example, it defines supported paper dimensions and font families:
var MM = 72 / 25.4; var PAPERS = { a4: [595.28, 841.89], letter: [612, 792], a3: [841.89, 1190.55], slide: [405, 720] }; var PAPER_NAMES = { a4: "A4", letter: "Letter", a3: "A3", slide: "16:9 slide" }; PDF page dimensions are commonly expressed in points, while some of the storyboard spacing settings are easier to understand in millimeters. The MM conversion value helps translate between these units.
The PAPERS object stores the available page dimensions. The application can use these values when calculating the size of each storyboard sheet.
The PAPER_NAMES object provides readable labels for the corresponding settings.
The application also defines font families for captions and other text:
var FONTS = { sans: "Arial, 'Helvetica Neue', Helvetica, sans-serif", serif: "Georgia, 'Times New Roman', serif", mono: "'Courier New', Courier, monospace", hand: "'Segoe Print', 'Bradley Hand', cursive" }; These values allow the storyboard renderer to use different text styles without repeating font definitions throughout the code.
Understanding the Application State
The application needs to remember information about the currently loaded PDF, its pages, captions, selected layout, and export process.
Instead of relying on individual variables scattered throughout the application, the implementation groups related information into a shared state object.
For example, the application tracks information such as:
- The loaded PDF document.
- The original PDF bytes.
- The current filename.
- Page captions.
- Page preview data.
- Loading and export status.
- The OCR worker when OCR is active.
- Cancellation and loading tokens.
The actual implementation manages these values within its application state and uses them throughout the rendering and export functions.
This becomes especially important when the user changes a caption or layout setting. The application needs to know which values have changed so it can update the storyboard preview without unnecessarily reopening the source document.
Uploading a PDF
The first step is allowing users to select a PDF from their device. The PDF Storyboard Generator supports two methods: selecting a file through the file picker or dragging and dropping it into the upload area.
The file input uses the following HTML:
<input type="file" id="aiot-sb-file-input" accept="application/pdf,.pdf" > Let's understand the accept attribute:
application/pdfis the MIME type for PDF files..pdfis the file extension.
A MIME type (Multipurpose Internet Mail Extensions type) identifies the format of a file. Browsers use MIME types to describe the kind of content a file contains. For example, application/pdf identifies a PDF document.
The application checks both the MIME type and the filename extension. This is useful because some browsers or operating systems may provide an empty or incorrect MIME type for a selected file.
The actual application uses this helper:
function isPdf(file) { return file.type === 'application/pdf' || /\.pdf$/i.test(file.name || ''); } The first condition checks the file's MIME type. The second checks whether its filename ends with .pdf. The i flag makes the extension check case-insensitive, so filenames such as document.PDF are also accepted.
After validation, both upload methods use the same handleFiles() function. Its initial steps are:
function handleFiles(list, password) { var all = Array.prototype.slice.call(list || []); ui.input.value = ''; if (!all.length) { return Promise.resolve(); } var file = all.filter(isPdf)[0]; if (!file) { toast("That isn't a PDF. Choose a PDF file.", 'error'); return Promise.resolve(); } var note = all.length > 1 ? ' Only ' + file.name + ' was opened; a storyboard uses one PDF.' : ''; var token = ++state.loadToken; var hadDoc = !!state.doc; var task, bytes; if (hadDoc) { ui.fileMeta.textContent = 'Opening ' + file.name + '…'; } setStatus('Opening ' + file.name + '…', true); // The remaining function loads and processes the selected PDF. } The function converts the supplied file list into an array and selects the first valid PDF. If no valid PDF is found, it displays an error message and stops.
The loadToken value helps the application distinguish the current loading operation from an older one. This matters when a user selects another document while a previous document is still being processed.
Next, the application waits for the PDF libraries to become available and reads the selected file:
return engine().then(function () { return file.arrayBuffer(); }).then(function (buf) { bytes = buf; var opts = { data: new Uint8Array(buf.slice(0)) }; if (password) { opts.password = password; } task = window.pdfjsLib.getDocument(pdfjsOptions(opts)); return task.promise; }); The file.arrayBuffer() method reads the PDF into browser memory. The application converts the data into a Uint8Array and passes it to PDF.js through getDocument().
If a password was supplied, it's added to the PDF.js options before the document is opened.
The complete function continues by measuring the PDF pages, checking whether the original pages can be embedded as vectors, updating the application state, and displaying the workspace.
This means the selected PDF is processed in the browser. It isn't uploaded to the website's server.
Loading the PDF with PDF.js
Once a file has been selected, the application reads its contents and passes the data to PDF.js.
The PDF.js loading process returns a document object. This object provides access to the document's pages and metadata.
In the actual application, PDF.js is initialized inside the file-loading process. The application first waits for the PDF libraries to load, reads the selected file, and then passes its data to PDF.js.
return engine().then(function () { return file.arrayBuffer(); }).then(function (buf) { bytes = buf; var opts = { data: new Uint8Array(buf.slice(0)) }; if (password) { opts.password = password; } task = window.pdfjsLib.getDocument(pdfjsOptions(opts)); return task.promise; }); The engine() function ensures that the required PDF libraries are available before processing begins. The application then uses file.arrayBuffer() to read the selected PDF into browser memory.
The Uint8Array constructor converts the file data into a format that PDF.js can process. If the user has supplied a password, it's added to the PDF.js options before the document is opened.
The getDocument() method starts the PDF loading process, and task.promise resolves when PDF.js has successfully opened the document.
The resulting document object provides access to the PDF's pages and metadata. The application stores this document for later operations, including measuring pages, extracting text, rendering previews, and generating the storyboard.
Measuring PDF Pages
Before arranging pages into storyboard panels, the application needs to know their dimensions.
PDF documents can contain pages with different sizes and orientations. Measuring each page helps the layout engine fit it correctly inside its panel.
The actual application uses the pageFacts() function to measure every page and periodically update the interface while processing large PDFs.
async function pageFacts(doc, token) { var sizes = []; for (var n = 1; n <= doc.numPages; n++) { if (token !== state.loadToken) { return null; } if (n % 25 === 0) { setStatus( 'Measuring pages: ' + n + ' of ' + doc.numPages + '…', true ); await nextFrame(); } var p = await doc.getPage(n); var vp = p.getViewport({ scale: 1 }); sizes.push([vp.width, vp.height]); } return sizes; } The function starts by creating an empty sizes array. It then loops through all pages using doc.numPages and retrieves each page with doc.getPage(n).
The getViewport({ scale: 1 }) method measures the page at its original scale. The function stores the resulting width and height in the sizes array.
The token parameter helps prevent an outdated loading operation from continuing. If the current token no longer matches state.loadToken, the function stops and returns null.
For larger PDFs, the application updates the loading status after every 25 pages and calls nextFrame() to give the browser an opportunity to update the interface.
Finally, the function returns the array containing the dimensions of all measured pages. These measurements are used later by the storyboard layout calculations.
Rendering PDF Pages on Canvas
The next task is displaying the PDF pages in the workspace.
PDF.js can render an individual page onto an HTML canvas. The canvas provides a visual representation that can be used in the page cards and storyboard preview.
The core rendering function looks like this:
async function renderPage(n, w, h) { var page = await state.doc.getPage(n); var b = page.getViewport({ scale: 1 }); var vp = page.getViewport({ scale: Math.min(w / b.width, h / b.height) }); var c = document.createElement('canvas'); c.width = Math.max(1, Math.round(vp.width)); c.height = Math.max(1, Math.round(vp.height)); var g = c.getContext('2d'); g.fillStyle = '#FFFFFF'; g.fillRect(0, 0, c.width, c.height); await page.render({ canvas: c, canvasContext: g, viewport: vp }).promise; return c; } The function accepts three parameters: n is the PDF page number, while w and h define the available width and height for the preview.
First, state.doc.getPage(n) retrieves the requested PDF page. The function then creates a viewport at scale 1 to obtain the page's original dimensions.
Next, Math.min(w / b.width, h / b.height) calculates a scale that fits the page inside the available space without changing its proportions.
The function creates an HTML canvas and sets its width and height using the calculated viewport dimensions. It fills the canvas with white before rendering the PDF page.
Finally, page.render() draws the page onto the canvas. The function waits for rendering to finish and returns the completed canvas for use in the page previews and storyboard.
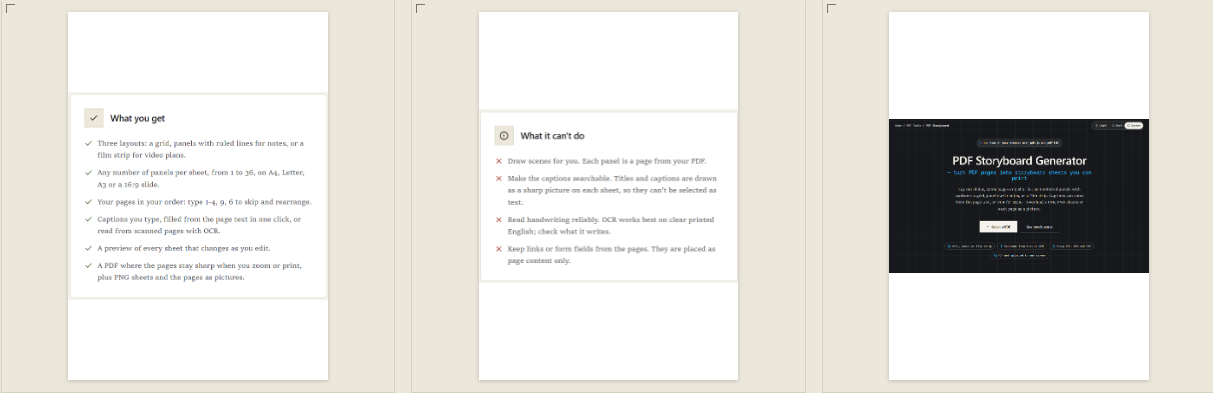
Reusing Rendered Page Previews
Rendering the same PDF page repeatedly can consume unnecessary processing time. For example, a page might be rendered once for its card preview and again when the storyboard preview is updated.
The application uses a page-picture cache to reuse previously rendered canvases.
var picCache = new Map(); // For the preview: reuse a page picture when one at least as big is already made. async function cachedPic(n, w, h) { var got = picCache.get(n); if (got && got.w >= w * 0.92) { picCache.delete(n); picCache.set(n, got); return got.c; } var c = await renderPage( n, Math.ceil(w * 1.15), Math.ceil(h * 1.15) ); picCache.set(n, { c: c, w: c.width }); while (picCache.size > 60) { var old = picCache.keys().next().value; picCache.get(old).c.width = 1; picCache.delete(old); } return c; } The application stores rendered page previews in a JavaScript Map called picCache. Each entry contains the rendered canvas and its width.
When cachedPic() is called, it first checks whether a cached image exists for the requested page. If the cached image is at least 92% of the requested width, the application reuses it instead of rendering the page again.
The function moves a reused entry to the end of the Map. This helps the application keep recently used previews available.
If a suitable cached image isn't available, the function calls renderPage() to create a new canvas. It renders the page at 1.15 times the requested width and height, providing some extra resolution for the preview.
To control memory usage, the cache is limited to 60 entries. When that limit is exceeded, the oldest entry is removed, and its canvas width is reduced to 1 to release its drawing resources.
This caching approach avoids unnecessary PDF rendering while keeping memory usage under control, especially when users work with longer documents.
Reading Text from PDF Pages
The storyboard generator can create captions in three ways:
- The user writes captions manually.
- The application extracts text from the PDF.
- OCR reads text from scanned pages.
For PDFs containing selectable text, PDF.js provides the getTextContent() method.
The actual application uses the readTexts() function to extract and store text from every page in the loaded PDF.
async function readTexts(token) { var doc = state.doc, out = []; for (var n = 1; n <= doc.numPages; n++) { if (token !== state.loadToken) { return; } try { var tc = await (await doc.getPage(n)).getTextContent(); out.push(tc.items.map(function (it) { return (it.str || '') + (it.hasEOL ? '\n' : ''); }).join('')); } catch (e) { out.push(''); } if (n % 20 === 0) { await nextFrame(); } } if (token !== state.loadToken) { return; } state.texts = out; refreshTags(board()); } The function starts by accessing the loaded PDF document through state.doc and creating an empty array called out to store the extracted text.
It then loops through every page and calls getTextContent() to retrieve its text items. The map() method combines each item's text into a single string. It also adds a newline when the PDF.js item indicates the end of a line through hasEOL.
If text extraction fails for a page, the function adds an empty string to the results instead of stopping the entire process.
The token check prevents an older PDF-loading operation from updating the current application state. The function also calls nextFrame() after every 20 pages to give the browser an opportunity to update the interface.
After processing all pages, the extracted text is stored in state.texts. The application then calls refreshTags(board()) to update the page information displayed in the workspace.
This stored text is used later when users choose to fill empty captions automatically.
Filling Empty Captions Automatically
Once the application has extracted text from the PDF pages, it can use that text to create captions.
The important behaviour is that the application fills only empty caption fields. It doesn't overwrite captions that users have already entered.
The application uses the captionFromText() helper to clean and shorten the extracted text:
function captionFromText(t) { var s = String(t || '') .replace(/\s+/g, ' ') .trim(); if (letters(s) < 3) { return ''; } if (s.length <= 200) { return s; } var cut = s.slice(0, 200); var end = Math.max( cut.lastIndexOf('. '), cut.lastIndexOf('? '), cut.lastIndexOf('! '), cut.lastIndexOf('। ') ); return end > 60 ? cut.slice(0, end + 1) : cut.replace(/\s+\S*$/, '') + '…'; } Here's what this function does:
- Converts the supplied value into a string.
- Replaces repeated whitespace with single spaces and removes whitespace from the beginning and end.
- Checks whether the text contains enough letters to be useful as a caption.
- Returns the complete text if it contains no more than 200 characters.
- For longer text, tries to end the caption at a sentence boundary. If there isn't a suitable boundary, it removes the incomplete final word and adds an ellipsis.
The application then uses fillFromText() to apply the generated captions to the selected storyboard pages.
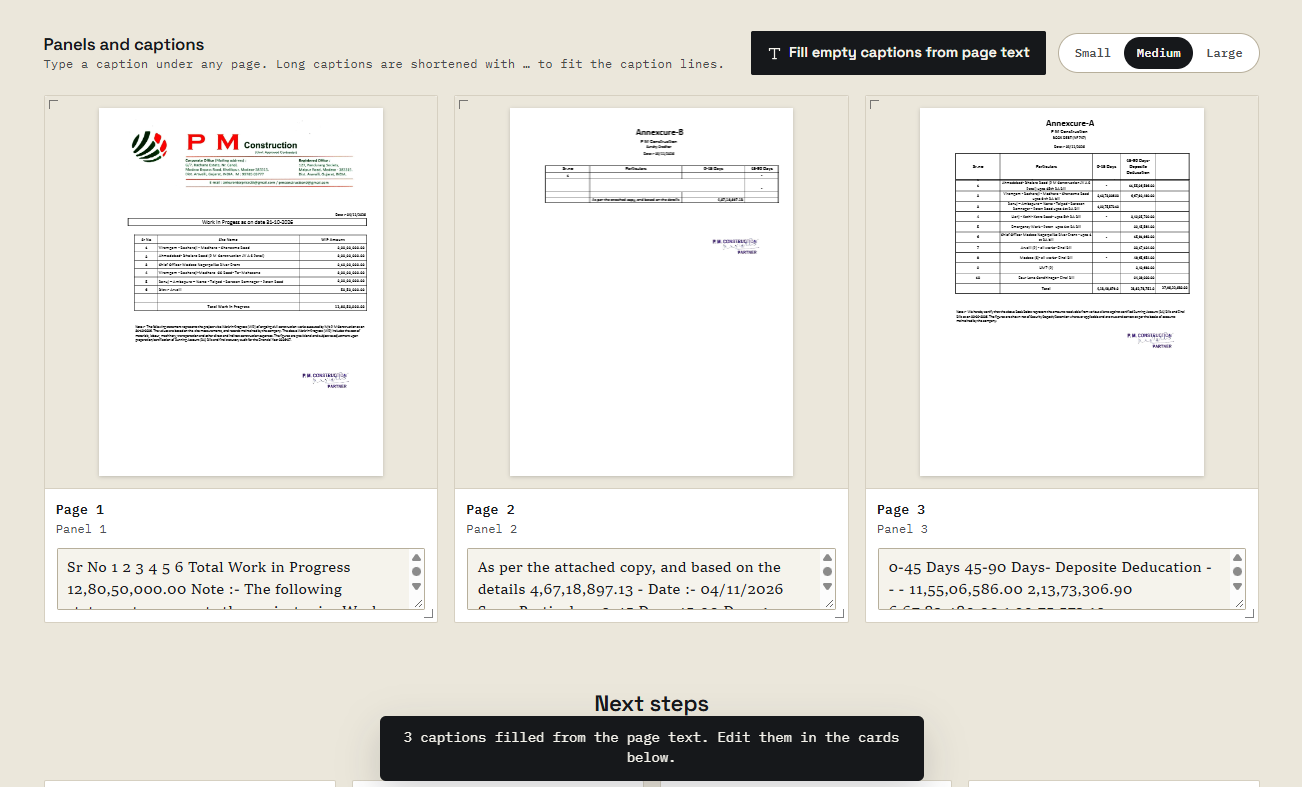
function fillFromText() { var bd = board(), list = bd.error ? [] : unique(bd.list), filled = 0, scans = 0; list.forEach(function (n) { if (captionFor(n)) { return; } var c = captionFromText(state.texts[n - 1]); if (c) { state.captions[n] = c; filled++; var ta = ui.grid.querySelector('[data-cap="' + n + '"]'); if (ta) { ta.value = c; } } else if (isScan(n)) { scans++; } }); if (!state.opts.captions && filled) { state.opts.captions = true; savePrefs(); } redrawSoon(0); if (!list.length) { toast(bd.error || 'No pages on the board.', 'error'); return; } toast( filled ? plural(filled, 'caption', 'captions') + ' filled from the page text. Edit them in the cards below.' + (scans ? ' ' + plural(scans, 'scanned page has', 'scanned pages have') + ' no text; use OCR for ' + (scans === 1 ? 'it' : 'them') + '.' : '') : scans ? 'The empty pages are scans with no text. Use Read with OCR.' : 'Every panel already has a caption.' ); } The fillFromText() function starts by calling board() to get the currently selected storyboard pages. It uses unique() to avoid processing the same page more than once.
For each selected page, captionFor(n) checks whether a caption already exists. If one is present, the function skips that page so the user's existing caption isn't overwritten.
If the caption is empty, the function retrieves the extracted text from state.texts and passes it to captionFromText(). When useful text is available, it saves the generated caption in state.captions and updates the corresponding textarea in the page card.
If a page has no extractable text and is identified as a scan, the function increases the scanned-page counter. Users can process these pages separately using OCR.
Finally, the application enables captions if necessary, saves the updated preferences, and schedules a preview refresh. It also displays a message showing how many captions were filled or whether OCR is needed.
This allows users to generate starting captions automatically while keeping their manually written descriptions intact.
Updating the Preview
Whenever a caption or relevant setting changes, the storyboard preview needs to be refreshed.
The application uses a small scheduling function to avoid redrawing the preview immediately after every individual change:
function redrawSoon(ms) { clearTimeout(drawTimer); drawTimer = setTimeout( drawPreview, ms === undefined ? 120 : ms ); } The redrawSoon() function first cancels any previously scheduled preview update using clearTimeout(). It then schedules drawPreview() using setTimeout().
By default, the application waits 120 milliseconds before refreshing the preview. If another change happens during that time, the previous scheduled redraw is cancelled and a new one is scheduled.
This helps prevent unnecessary repeated rendering when users are typing captions or adjusting settings.
Drawing the Updated Preview
Once the redraw is scheduled, the drawPreview() function calculates the current storyboard configuration and updates the visible preview canvas.
The following is the actual implementation from the application:
async function drawPreview() { if (!state.doc) { return; } var my = ++drawToken, bd = board(); refreshTags(bd); syncPanel(); if (bd.error) { ui.boardMsg.textContent = bd.error; ui.sheetPos.textContent = 'No sheets'; ui.sheetCount.textContent = ''; root.querySelectorAll('[data-needs-board]').forEach(function (b) { b.disabled = true; }); return; } root.querySelectorAll('[data-needs-board]').forEach(function (b) { b.disabled = state.busy; }); var L = bd.L, o = state.opts; state.sheet = clamp(state.sheet, 0, L.sheets - 1); ui.boardMsg.textContent = L.tight ? 'Captions leave little room for the pages. Use fewer caption lines, fewer rows or a smaller text size.' : ''; ui.sheetPos.textContent = 'Sheet ' + (state.sheet + 1) + ' of ' + L.sheets; ui.sheetCount.textContent = plural(bd.list.length, 'panel', 'panels') + ' on ' + plural(L.sheets, 'sheet', 'sheets') + ', ' + PAPER_NAMES[o.paper] + ' ' + o.orient; q('[data-act="sheet-prev"]').disabled = state.sheet <= 0; q('[data-act="sheet-next"]').disabled = state.sheet >= L.sheets - 1; ui.sheetWrap.style.aspectRatio = L.W + ' / ' + L.H; var cssW = ui.sheetWrap.clientWidth || 600; var dpr = Math.min(window.devicePixelRatio || 1, 2); var k = cssW * dpr / L.W; var off = document.createElement('canvas'); off.width = Math.round(L.W * k); off.height = Math.round(L.H * k); var done = await drawSheet( off.getContext('2d'), o, bd.list, L, state.sheet, k, 'full', function (n, w, h) { return my === drawToken ? cachedPic(n, w, h) : Promise.resolve(null); } ); if (!done || my !== drawToken) { return; } ui.sheet.width = off.width; ui.sheet.height = off.height; ui.sheet.getContext('2d').drawImage(off, 0, 0); off.width = 1; var start = state.sheet * L.per; var on = bd.list.slice(start, start + L.per); ui.sheet.setAttribute( 'aria-label', 'Sheet ' + (state.sheet + 1) + ' of ' + L.sheets + ': ' + (on.length === 1 ? 'page ' + on[0] : 'pages ' + on.join(', ')) ); ui.sheet.setAttribute('data-drawn', String(state.sheet + 1)); } The function first checks whether a PDF document is loaded. It then calls board() to retrieve the selected pages and calculate the storyboard layout.
The drawToken value helps prevent an older preview-rendering operation from replacing a newer one. The function also calls refreshTags() and syncPanel() to update the page information and settings panel.
Next, it checks whether the selected board has any errors. If the selection is valid, it calculates the current sheet position and updates the sheet counter, panel count, paper information, and Previous and Next buttons.
The function then calculates the canvas scale using the available preview width and the device pixel ratio. The device pixel ratio is capped at 2 to limit the amount of rendering work.
The drawSheet() function draws the selected storyboard sheet onto a temporary canvas. It receives cachedPic() as a callback so previously rendered PDF page previews can be reused.
After drawing finishes, the function checks whether the operation is still current. If it is, the completed temporary canvas is copied onto the visible preview canvas.
Finally, the temporary canvas is released by reducing its width to 1. The application also updates the preview's accessibility label and records which sheet has been drawn.
This process allows users to see their storyboard changes without downloading a new PDF every time they adjust a caption or setting.
Choosing the Storyboard Layout
The tool supports three layout styles: Grid, Panels with notes, and Film strip. Each layout is designed for a different type of project.
Grid layout arranges PDF pages in rows and columns. It works well for reviewing presentation slides, comic pages, and documents.
Panels with notes provides additional writing space below each page. It's useful for lecture notes, planning, and reviewing visual material.
Film strip arranges pages as a sequence of frames. It's useful for planning videos, reels, and scenes.
The selected layout is stored in the application's state. When users choose a different layout, the application updates the number of columns and rows to provide suitable default settings.
The following excerpt from the actual onField() function handles layout changes:
if (f === 'layout' && e.type === 'change') { // sensible panel counts for each layout if (o.layout === 'notes') { o.cols = o.orient === 'landscape' ? 2 : 1; o.rows = o.orient === 'landscape' ? 3 : 4; } if (o.layout === 'strip') { o.cols = 4; o.rows = o.orient === 'landscape' ? 2 : 4; } if (o.layout === 'grid') { o.cols = o.orient === 'landscape' ? 3 : 2; o.rows = o.orient === 'landscape' ? 2 : 3; } } savePrefs(); if (f === 'cols' || f === 'rows' || f === 'layout') { state.sheet = 0; } redrawSoon(f === 'gap' ? 60 : 0); This code checks which layout the user has selected and adjusts the default column and row counts according to the layout and paper orientation.
For example:
- Panels with notes: Uses 2 columns and 3 rows in landscape orientation, or 1 column and 4 rows in portrait orientation.
- Film strip: Uses 4 columns, with 2 rows in landscape orientation or 4 rows in portrait orientation.
- Grid: Uses 3 columns and 2 rows in landscape orientation, or 2 columns and 3 rows in portrait orientation.
After updating these values, savePrefs() saves the settings. The application resets the current sheet to the first sheet when the layout changes and calls redrawSoon() to refresh the preview.
Users can still adjust the number of rows and columns manually using the board settings.
Controlling Rows, Columns, and Paper Size
Users can choose between 1 and 6 columns and rows per sheet. This gives them control over how many PDF pages appear together.
The application also supports different paper sizes, including A4, Letter, A3, and a 16:9 slide format. Each format can be displayed in portrait or landscape orientation.
For example, a 3-column and 2-row layout can display six PDF pages on one sheet. A 4-column and 3-row layout can display twelve pages.
The application calculates the number of panels that fit on each sheet by multiplying the selected columns by the selected rows. It then determines how many sheets are needed for all selected pages.
The following function from the actual application calculates the sheet dimensions based on the selected paper size and orientation:
function sheetSize(o) { var p = PAPERS[o.paper] || PAPERS.a4; var a = Math.min(p[0], p[1]); var b = Math.max(p[0], p[1]); return o.orient === 'portrait' ? [a, b] : [b, a]; } The PAPERS object contains the dimensions for each supported paper format. The function retrieves the selected dimensions and arranges them according to the chosen orientation.
For portrait orientation, the shorter dimension becomes the width and the longer dimension becomes the height. For landscape orientation, these dimensions are reversed.
The layout calculation then uses the selected rows and columns to determine the number of panels per sheet:
var per = o.cols * o.rows; var sheets = Math.max(1, Math.ceil(list.length / per)); Here, per represents the number of panels on one sheet. The Math.ceil() function rounds up the total number of required sheets so that any remaining pages are placed on an additional sheet.
The layout engine also calculates the available space and positions each panel so that the pages fit within the selected sheet dimensions.
When more pages are selected than can fit on one sheet, the remaining panels are placed on additional sheets.
Selecting PDF Pages and Their Order
Users don't always need every page in the original PDF.
The tool supports using all pages, selecting a page range, or entering a custom page sequence.
For example, a user could enter:
1-4, 9, 6 This creates a storyboard using pages 1, 2, 3, 4, 9, and 6 in that exact order.
The application uses the parseList() function to process the custom page selection and check whether the requested page numbers are valid.
Here is the actual implementation from the application:
function parseList(text) { var t = String(text || '').trim(); if (!t) { return { error: 'Type the pages, for example 1-4, 7, 5.' }; } var out = [], parts = t.split(/[,;\s]+/).filter(Boolean); for (var i = 0; i < parts.length; i++) { var part = parts[i], m = /^(\d+)(?:\s*[-–]\s*(\d*))?$/.exec(part); if (!m) { return { error: '"' + part + '" isn\'t a page number or range.' }; } var a = parseInt(m[1], 10), b = m[2] === undefined ? a : (m[2] === '' ? state.count : parseInt(m[2], 10)); if (a < 1) { return { error: 'Pages start at 1, so "' + part + '" doesn\'t work.' }; } if (b < a) { return { error: '"' + part + '" is backwards. Did you mean ' + b + '-' + a + '?' }; } if (a > state.count) { return { error: 'Page ' + a + ' is past the end; this PDF has ' + plural(state.count, 'page', 'pages') + '.' }; } if (b > state.count) { return { error: 'Page ' + b + ' is past the end. Type ' + a + '- to go to the last page.' }; } for (var n = a; n <= b; n++) { out.push(n); } } if (out.length > 500) { return { error: 'That\'s ' + out.length + ' panels. Use 500 or fewer.' }; } return { pages: out }; } The function first converts the input into a trimmed string. It then splits the selection using commas, semicolons, or spaces.
The regular expression checks whether each entry is a single page number or a page range. For example, 3 represents page 3, while 2-5 represents pages 2 through 5.
The function also supports an open-ended range such as 4-. In this case, the application uses state.count as the final page number.
Before adding pages to the result, it checks that page numbers start at 1, ranges are in ascending order, and no requested page exceeds the total number of pages in the PDF.
The application also limits custom selections to 500 panels. If the input is valid, the function returns an array of page numbers in the exact order entered by the user.
The panels() function then uses this result when building the storyboard. If the user selects all pages instead of entering a custom list, it returns every page in the original order.
This feature is helpful w...


